This guide outlines how I built a dynamic floor plan that gets details out of AD and displays them in SharePoint 2010.
Requirements:
- SharePoint 2010 w/ Enterprise Features (Although it may work with earlier versions)
- Visio 2010 (Although it may work with earlier versions)
- Active Directory
- Some knowledge of VB.net, SharePoint, Active Directory, Java script and CSS
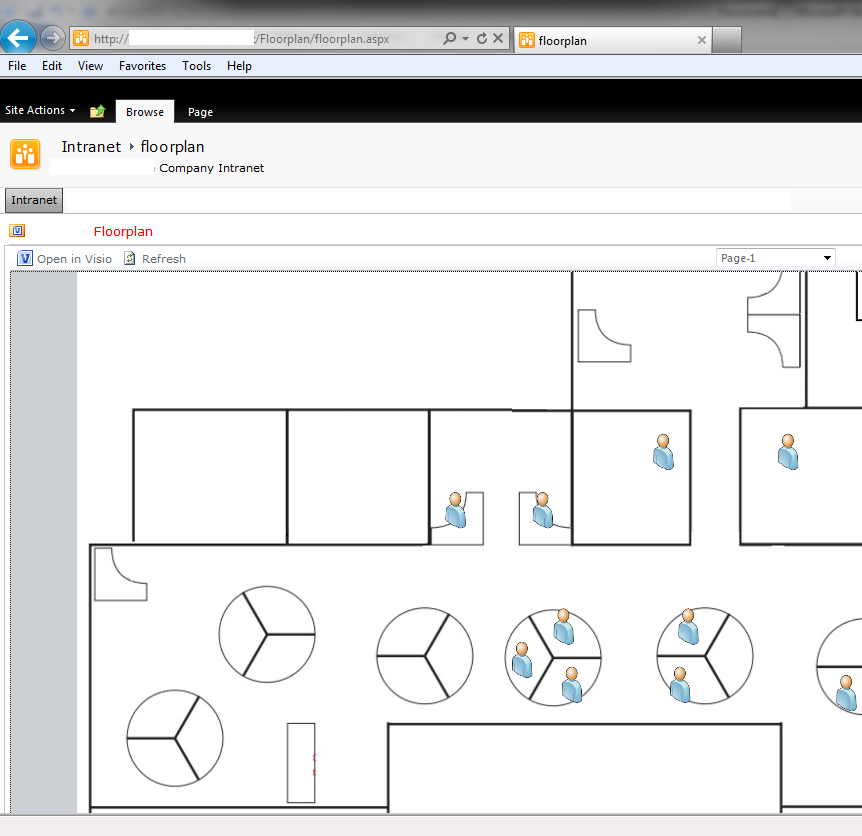
Firstly, this is what it looks like for me, but bear in mind you will be supplying the background image, and choosing the icons you want to use for the ‘people’ entities yourself. I chose one named ‘torso’
Pretty basic looking, Although if you hover over someone you also get their details which are updated from Active Directory
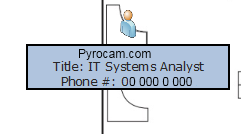
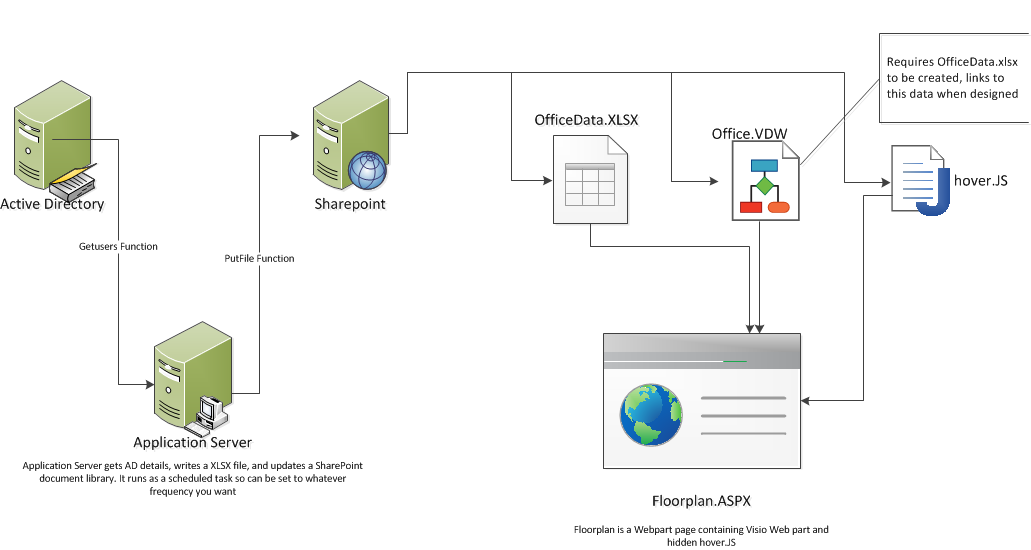
There is two systems working together to bring this up.
Firstly a Visio Web Drawing, that is linked to a spreadsheet in SharePoint, stores the floor plan image and icon locations and popup content. Its displayed on a web part page with a little bit of hidden JSÂ on the side to display the popups.
Behind the scenes I also have an application that periodically polls Active Directory for user information and updates the spreadsheet.
How to do it.
Firstly you need to create some data and put it into a SharePoint document library. if you want you can skip this step and come back to it later, just create a dummy XLSX file with data in it like so. Call it OfficePlanData.XLSX
| SpaceID | Name | Title | Phone |
| a1026 | user A | demo title | 2349 |
| a1020 | User B | demo title | 7151 |
| a1031 | User C | demo title | 8004 |
| a1028 | user A | demo title | 3429 |
| a1027 | User B | demo title | 5339 |
| a1025 | User C | demo title | 3188 |
You may want to do this another way, perhaps maintain this file manually, or export data from AD manually etc. I didn’t so I wrote a tool that would take details out of AD, store them in a xlsx file, then upload that to the document library every 60 minutes
Here is the source code to the vb.net project I built (VS2010) that takes user name, title, phone number and extensionattribute1 from AD. (Extension Attribute 1 is storing a unique ‘location’ ID that I call ‘SpaceID’) and upload it to the document Library
It is a console application, requires office 2010 to be added as a service reference. You could easily re-write it to use a different office version I am sure.
Imports System.DirectoryServices
Imports System.Web
Imports System.Configuration
Imports System.Xml
Imports System.Net
Imports Microsoft.Office.Interop

Module Module1
    Public sSPURL As String = "http://yoursharepointsite.com"
       Public sDocLib As String = "Floorplan" 'the name of the document library
    Public sUser As String = "sharepointhelper" 'a user with access to upload files to that document library and do AD lookups
    Public sPwd As String = "password123" 'users password
    Public sDomain As String = "domainname.local" 'the local domain
    Public localfile As String = "C:\Program Files\ADtoFloorplan\OfficePlanData.xlsx" 'the temporary location of the file before upload
    Public destinationfile As String = "OfficePlanData.xlsx" 'the filename thats going into the document library

    Dim userarray(1000, 6)

    Sub Main()

        Call getusers()

        UploadDocument(localfile, destinationfile)

    End Sub

    Public Sub getusers()

        ' Bind to the users container.
        Dim ldapServerName = "domainname"

        Dim oRoot As DirectoryEntry = New DirectoryEntry("LDAP://" & ldapServerName & "/OU=Users,DC=DOMAINNAMECHANGEME,DC=local")

        Dim oSearcher As DirectorySearcher = New DirectorySearcher(oRoot)
        Dim oResults As SearchResultCollection
        Dim oResult As SearchResult

        Dim name, homedrive, extat1, title, phone

        Dim iplacer As DirectoryEntry = New DirectoryEntry

        userarray(0, 0) = "SpaceID"
        userarray(0, 1) = "Name"
        userarray(0, 2) = "Title"
        userarray(0, 3) = "Phone"

        Try

            oResults = oSearcher.FindAll
            Dim i As Integer = 1

            For Each oResult In oResults
                name = oResult.GetDirectoryEntry().Properties("name").Value
                title = oResult.GetDirectoryEntry().Properties("title").Value
                phone = oResult.GetDirectoryEntry().Properties("telephoneNumber").Value
                homedrive = oResult.GetDirectoryEntry().Properties("homeDrive").Value
                extat1 = oResult.GetDirectoryEntry().Properties("extensionattribute1").Value

                If extat1 <> "" Then 'only populate the file with people who have extension attribute 1 set

                    userarray(i, 0) = extat1
                    userarray(i, 1) = name
                    userarray(i, 2) = title
                    userarray(i, 3) = phone

                    i = i + 1

                End If

            Next

            WriteSpreadsheetFromArray(userarray, localfile)

        Catch e As Exception

            Console.WriteLine("Error is " & e.Message)

        End Try

    End Sub

    Public Sub WriteSpreadsheetFromArray(ByVal strOutputArray As Array, Optional ByVal strExcelFileOutPath As String = "")

        Dim objxlOutApp As Excel.Application
        Dim objxlOutWBook As Excel.Workbook
        Dim objxlOutSheet As Excel.Worksheet
        Dim objxlRange As Excel.Range
        'Try to Open Excel, Add a workbook and worksheet
        Try
            'Try to Open Excel, Add a workbook and worksheet
            objxlOutApp = New Excel.Application
            objxlOutWBook = objxlOutApp.Workbooks.Add '.Add.Sheets
            objxlOutSheet = DirectCast(objxlOutWBook.Sheets.Item(1), Excel.Worksheet)
        Catch ex As Exception
            MsgBox("While trying to Open Excel recieved error:" & ex.Message, , "Export to Excel Error")
            Try
                If Not IsNothing(objxlOutWBook) Then
                    objxlOutWBook.Close()  'If an error occured we want to close the workbook
                End If
                If Not IsNothing(objxlOutApp) Then
                    objxlOutApp.Quit() 'If an error occured we want to close Excel
                End If
            Catch
            End Try
            objxlOutSheet = Nothing
            objxlOutWBook = Nothing
            'If Not IsNothing(objxlOutApp) Then
            'System.Runtime.InteropServices.Marshal.ReleaseComObject(objxlOutApp)  'This will release the object reference
            'End If
            objxlOutApp = Nothing
            Exit Sub 'An error occured so we don't want to continue
        End Try
        Try
            objxlOutApp.DisplayAlerts = False    'This will prevent any message prompts from Excel (IE.."Do you want to save before closing?")
            objxlOutApp.Visible = False    'We don't want the app visible while we are populating it.
            'This is the easiest way I have found to populate a spreadsheet
            'First we get the range based on the size of our array
            objxlRange = objxlOutSheet.Range(Chr(strOutputArray.GetLowerBound(1) + 1 + 64) & (strOutputArray.GetLowerBound(0) + 1) & ":" & Chr(strOutputArray.GetUpperBound(1) + 1 + 64) & (strOutputArray.GetUpperBound(0) + 1))
            'Next we set the value of that range to our array
            objxlRange.Value = strOutputArray
            'This final part is optional, but we Auto Fit the columns of the spreadsheet.
            objxlRange.Columns.AutoFit()
            If strExcelFileOutPath.Length > 0 Then 'If a file name is passed
                Dim objFileInfo As New IO.FileInfo(strExcelFileOutPath)
                If Not objFileInfo.Directory.Exists Then 'Check if folder exists
                    objFileInfo.Directory.Create() 'If not we create it
                End If
                objFileInfo = Nothing
                objxlOutWBook.SaveAs(strExcelFileOutPath)  'Then we save our file.
            End If
            objxlOutApp.Visible = True 'Make excel visible
        Catch ex As Exception
            MsgBox("While trying to Export to Excel recieved error:" & ex.Message, , "Export to Excel Error")
            Try
                objxlOutWBook.Close()  'If an error occured we want to close the workbook
                objxlOutApp.Quit() 'If an error occured we want to close Excel
            Catch
                Console.WriteLine(ex.Message)
            End Try
        Finally
            objxlOutWBook.Close()  'If an error occured we want to close the workbook
            objxlOutApp.Quit()

            objxlOutSheet = Nothing
            objxlOutWBook = Nothing
            'If Not IsNothing(objxlOutApp) Then
            '    System.Runtime.InteropServices.Marshal.ReleaseComObject(objxlOutApp) 'This will release the object reference
            'End If
            objxlOutApp = Nothing

        End Try

    End Sub

    Public Function UploadDocument(ByVal localFile As String, _
               ByVal remoteFile As String) As String
        '// Read in the local file
        On Error GoTo handler
        Dim r As Byte()
        Dim Strm As System.IO.FileStream = New System.IO.FileStream(localFile, _
                    System.IO.FileMode.Open, System.IO.FileAccess.Read)
        Dim reader As System.IO.BinaryReader = New System.IO.BinaryReader(Strm)
        Dim filecontents As Byte() = reader.ReadBytes(CInt(Strm.Length))
        reader.Close()
        Strm.Close()

        Dim sRemoteFileURL As String

        Dim NC As System.Net.NetworkCredential = _
            New System.Net.NetworkCredential(sUser, sPwd, sDomain)
        sRemoteFileURL = sSPURL & "/" & sDocLib & _
                         "/" & Trim(LTrim(RTrim(remoteFile)))

        sRemoteFileURL = Replace(sRemoteFileURL, " ", "%20")
        sRemoteFileURL = Replace(sRemoteFileURL, "\", "/")
        Dim m_WC As WebClient = New WebClient
        m_WC.Credentials = NC
        r = m_WC.UploadData(sRemoteFileURL, "PUT", filecontents)
        Return "TRUE"
        Exit Function
handler:
        Return Err.Description
    End Function

End Module
I used the following references to build this app
Creating a XLSX file from vb.net: http://www.vbforums.com/showthread.php?t=455162
Uploading a file to a SharepPoint document library: http://www.codeproject.com/KB/sharepoint/File_Shunter.aspx
Getting AD details : http://www.codeproject.com/KB/system/active_directory_in_vbnet.aspx (Started with this, its a bit different now)
You will need to change a few things in there obviously, only as far as
Dim oRoot As DirectoryEntry = New DirectoryEntry("LDAP://" & ldapServerName & "/OU=Users,DC=DOMAINNAMECHANGEME,DC=local")
Though.
I have compiled this as a console application then used task scheduler to run it every hour. you could quite easily also create a service and user your own system.timer if you prefered.
So I am going to assume you now have a xlsx file called officeplandata sitting in your document library which is in the root of your site, and is called ‘floorplan’
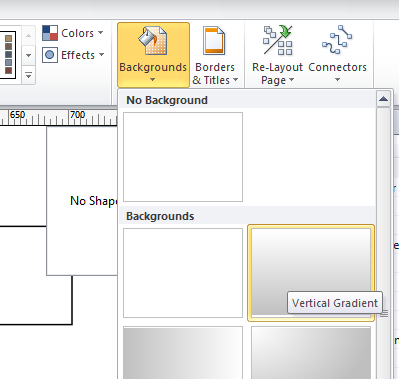
open up Visio 2010, first thing we need is the background image, personally I found it was easiest to set the floor plan image as a jpg in the background instead of an image on the page as it means it won’t get in the way when placing other objects on top of it. To do this, add a generic background, then overlay your image on the second tab of the document like so.
You will want your image to be the same aspect ratio as the document (eg letter/a4) so it consumes the entire page.
Now link your data to the xlsx spreadsheet we created earlier. Go to the Data tab, click on Link Data to Shapes, and select Excel Workbook, and link it to the URL of the excel file
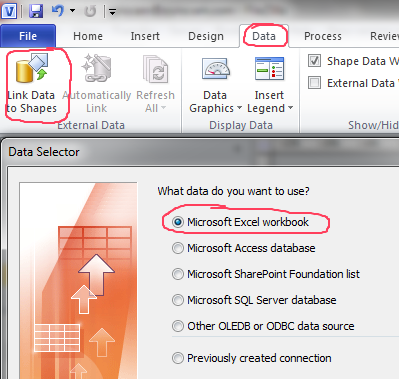

Click Next, choose ‘SpaceID’ as the unique Identifier, and finish.
If you have done everything correctly you should now be looking at your blank floor plan with a list of users on the right, something like this. 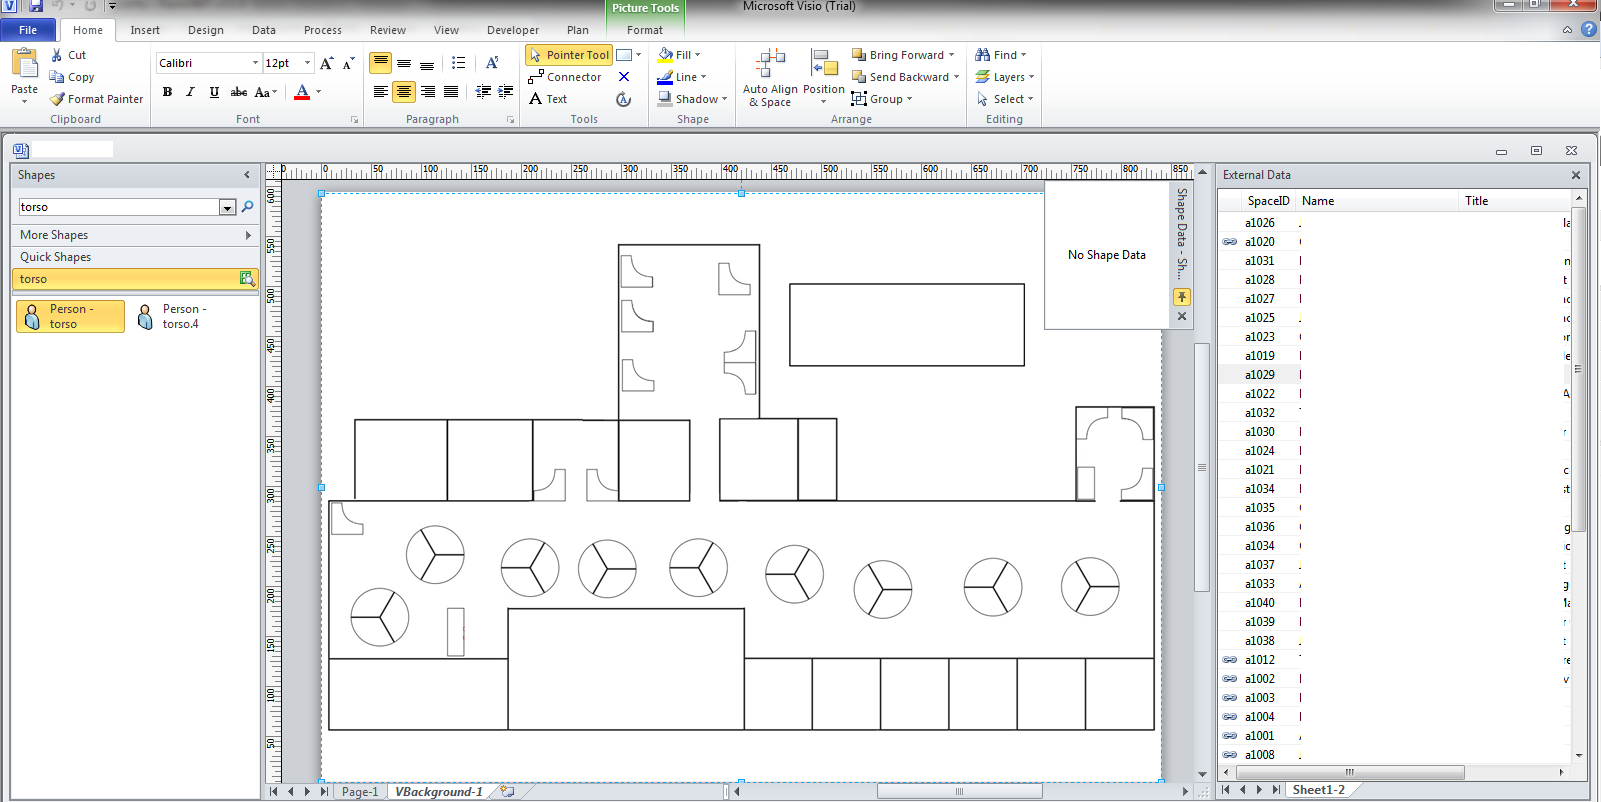
Flick back to Page-1 if you have not already, search an appropriate icon for your people, as you can see I am using ‘torso’
select the icon, so that its highlighted as you can see above, then drag someone from the right, (the linked data) onto the plan. This will create the shape that is highlighted and link it to the shapeID with all the users details. I have remove the Data Graphics as I found they were too much. to do this, select all icons, then click ‘Data’ from the Ribbon, Data Graphics, then ‘No Data Graphic’
Save the document as a Visio Web Diagram and upload it to the document library.
Assuming you have SharePoint set up correctly you could view the VDW as is and it would show you all the people, but nothing happens when you hover over anyone. Almost there!
Now create a new web part page in the document library, I suggest a Full Page, Vertical
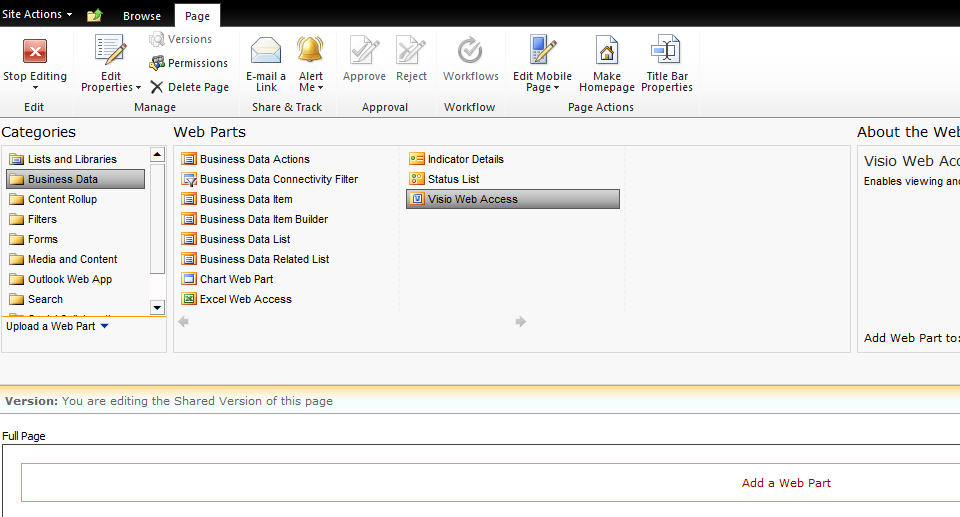
Add a Visio Web Access web part (Under Business Data),
Now create a text file somewhere and paste this into it, save it as floorplan.js or hover.js or whatever you please.
// ECMAScript source code.
<script language="javascript">
//Â OfficePlanData.js
// Copyright (c) Microsoft Corporation. All rights reserved.
// Description:Â This script shows how to use shape text overlays
//Â Â Â Â Â Â Â Â Â Â Â Â Â Â to display shape data.
//
// IMPORTANT: To enable this script, ensure that the variable webPartElementId
// refers to the HTML ID of the Visio Web Access Web Part that
// you want to code against. You can find this ID by searching the source
// of a Web Parts page containing a Visio Web Access Web Part for
// a tag that contains; you should assign
// the value of the id attribute of that tag's grandparent to webPartElementId.
// Add a hook into the AJAX Sys.Application.load event, raised after all scripts
// have been loaded and the objects in the application have been created
// and initialized.
Sys.Application.add_load(onApplicationLoad)
// Declare global variables for the application.
// The HTML tag ID of the Visio Web Access part.
var webPartElementID = "WebPartWPQ3";Â Â
// The Visio Web Access Web part.
var vwaControl;
// The current page.
var vwaPage;
// The collection of all the shapes on the current page.
var vwaShapes; Â
//Â Function Name:Â Â Â Â Â onApplicationLoad()
//Â Parameters:Â Â Â Â Â Â Â Â None
//Â Description:Â Â Â Â Â Â Â This function handles the AJAX Sys.Application.load event.
//Â Â Â Â Â Â Â Â Â Â Â Â Â Â Â Â Â Â Â Â Â When this event is raised, the function captures references
//Â Â Â Â Â Â Â Â Â Â Â Â Â Â Â Â Â Â Â Â Â to the Visio Web Access Web Part object and registers
//Â Â Â Â Â Â Â Â Â Â Â Â Â Â Â Â Â Â Â Â Â the following Visio Web Access specific event handler:
//
//Â Â Â Â Â Â Â Â Â Â Â Â Â Â Â Â Â Â Â Â Â diagramcomplete:Â Â Â Â Â Â Â raised when the request for a Web
//Â Â Â Â Â Â Â Â Â Â Â Â Â Â Â Â Â Â Â Â Â Â Â Â Â Â Â Â Â Â Â Â Â Â Â Â Â Â Â Â Â Â Â Â Â drawing page finishes.
function onApplicationLoad() {
       try{
               vwaControl= new Vwa.VwaControl(webPartElementID);
               vwaControl.addHandler("diagramcomplete", onDiagramComplete);
       }
       catch(err){
       }
}
//Â Function Name:Â Â Â Â Â onDiagramComplete()
//Â Parameters:Â Â Â Â Â Â Â Â None
//Â Description:Â Â Â Â Â Â Â This function handles the diagramcomplete event, which is
//Â Â Â Â Â Â Â Â Â Â Â Â Â Â Â Â Â Â Â Â Â raised when a request for a Web drawing page has been completed.
//Â Â Â Â Â Â Â Â Â Â Â Â Â Â Â Â Â Â Â Â Â When the event is raised, this function captures references
//Â Â Â Â Â Â Â Â Â Â Â Â Â Â Â Â Â Â Â Â Â to the script's global variables, such as the current page
//Â Â Â Â Â Â Â Â Â Â Â Â Â Â Â Â Â Â Â Â Â and the collection of shapes on the page. It also sets
//Â Â Â Â Â Â Â Â Â Â Â Â Â Â Â Â Â Â Â Â Â the zoom to page width and registers the shapemouseenter
//Â Â Â Â Â Â Â Â Â Â Â Â Â Â Â Â Â Â Â Â Â and shapemouseleave event handlers.
function onDiagramComplete() {
       try{
               vwaPage = vwaControl.getActivePage();
               vwaShapes = vwaPage.getShapes();
               vwaPage.setZoom(-1);                            Â
               vwaControl.addHandler("shapemouseleave", onShapeMouseLeave);
                       vwaControl.addHandler("shapemouseenter", onShapeMouseEnter);
       }
       catch(err){
       }
}
// Function Name:Â Â onShapeMouseEnter()
// Parameters:Â Â Â Â Â source: A reference to the object that raised
//Â Â Â Â Â Â Â Â Â Â Â Â Â Â Â Â Â Â Â Â Â Â Â Â Â the shapemouseenter event.
//Â Â Â Â Â Â Â Â Â Â Â Â Â Â Â Â Â args:Â Â The Visio shape ID of the shape the mouse entered.
// Description:Â Â Â Â This function handles the shapemouseenter event, which
//Â Â Â Â Â Â Â Â Â Â Â Â Â Â Â Â Â is raised when the mouse enters the bounding box of a shape
//Â Â Â Â Â Â Â Â Â Â Â Â Â Â Â Â Â from the active Web drawing page. When the event is raised,
//Â Â Â Â Â Â Â Â Â Â Â Â Â Â Â Â Â this function displays shape data.
onShapeMouseEnter = function (source, args)
{
        var vwaPage = vwaControl.getActivePage();
        var vwaShapes = vwaPage.getShapes();
        var shape = null;
        if (vwaShapes!= null)
        {
            shape = vwaShapes.getItemById(args);
        }
        var data = null;
        if (shape != null)
        {
            data = shape.getShapeData();
        }
        for (var j = 0; j < data.length; j++)
       {
            if (data[j].label == "Name")
               {
               var name = data[j].value.toString();
               }
                   if (data[j].label == "Title")
               {
               var Title = data[j].value.toString();
               }
           if (data[j].label == "Phone")
               {
                var number = data[j].value.toString();
               }
                   if (data[j].label == "SpaceID")
               {
               var office = data[j].value.toString();
               }
       }             Â
       shape.addOverlay(
                           "Overlay",
                           '<center><div style="border:solid 5px #000000; font-size: 35; background-color:#b0c4de;">' + name + '<br>' + 'Title: ' + Title + '<br>' + 'Phone #: ' + number + '</div></center>',
                           1,
                           2,
                           600,
                           400);
}
// Function Name:Â Â onShapeMouseLeave
// Parameters:Â Â Â Â Â source: A reference to the object that raised
//Â Â Â Â Â Â Â Â Â Â Â Â Â Â Â Â Â Â Â Â Â Â Â Â Â the shapemouseleave event.
//Â Â Â Â Â Â Â Â Â Â Â Â Â Â Â Â Â args: The Visio shape ID of the shape the mouse left.
// Description:Â Â Â Â This function handles the shapemouseleave event, which
//Â Â Â Â Â Â Â Â Â Â Â Â Â Â Â Â Â is raised when the mouse leaves the bounding box of a shape
//Â Â Â Â Â Â Â Â Â Â Â Â Â Â Â Â Â from the active Web drawing page. When the event is raised,
//Â Â Â Â Â Â Â Â Â Â Â Â Â Â Â Â Â this function removes the overlay.
onShapeMouseLeave = function (source, args)
{
               try{
       vwaShapes.getItemById(args).removeOverlay("Overlay");
      }
               catch(err){
               }
}
</script>
Upload this to the document library, then back in your web part page add a Content Editor (Media and Content) and link it to the uploaded javascript, eg: /Floorplan/floorplan.js
Goto Layout, and select ‘hidden’

Save the page and cross your fingers; View it.
With any luck your page will now show the floorplan, hovering over the people will show relevant details. and everything will be done.
You can edit what the box looks like by editing the JS file, line 130 is what you want.
Version 1.0 created 22/09/11


Great article! This is exactly what I was looking for. It took a while to find but well worth it.
Nice idea and solution. Quite innovative. I wonder if making LDAP calls directly to the Active Directory might work. I think that is what this software (floorplanmapper.com) does.
Great article! Question: Is there a way to make this searchable; like if you enter an employee’s name or ID it drops a pin on their location in the floor plan? Thanks in advance.
Awesome article – FYI, there are some off the shelf AD/Floor Plan solutions available now – try Floor Plan Mapper.